Stenciling and painting


I'm crazy about this combination of colors. This painting was based on a project in a new book called Acrylic Techniques in Mixed Media by Roxanne Padget who has a wonderful way with colors.


Just messing around with stencils with paints and water soluble crayons. It still needs more work.

Tim Holtz shadowbox project and an ATB

Oh lordy. I'm getting lazy about posting again. Been busy pinning though! Posting and editing pictures of projects etc. takes a lot more work. I'm hoping for the day I can easily use speech recognition instead of my laborious typing. Oh well.

Anyway, I'll start with the oldest project first and then go from there.

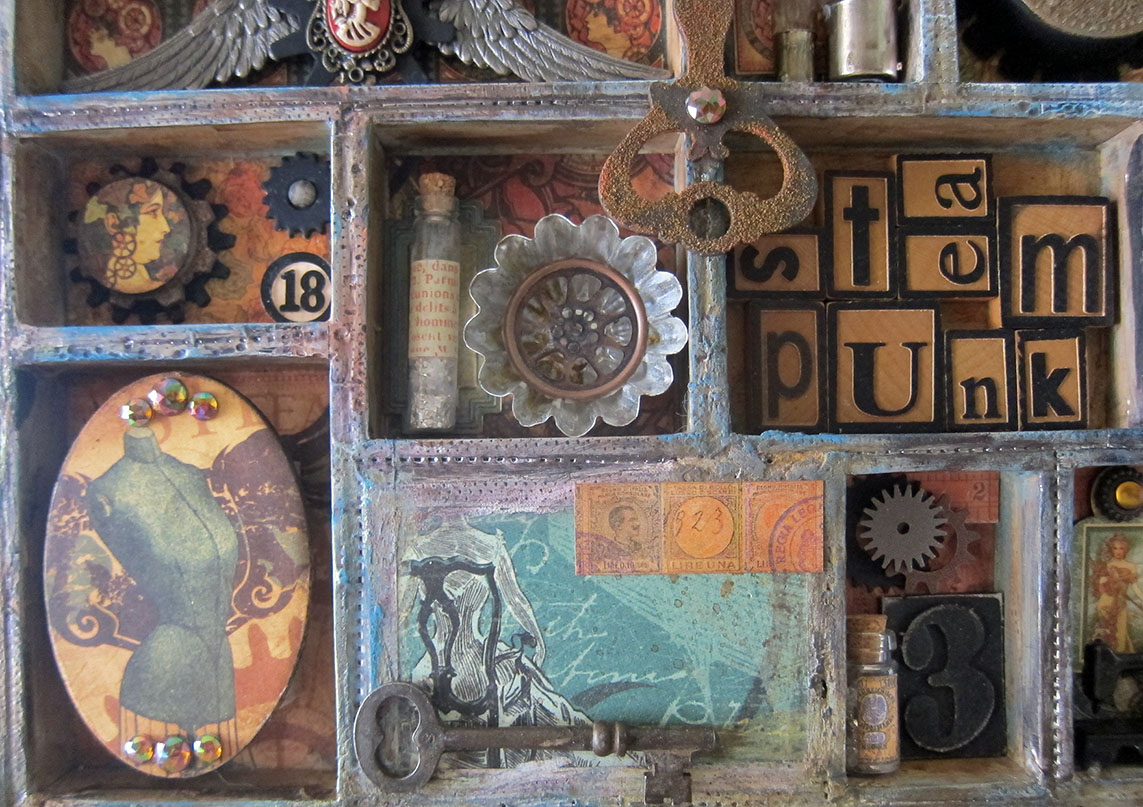
This was first done in a class a year ago where it languished unfinished until I did a clean-up of my art room after the holidays. It's a Tim Holtz shadowbox that was layered with metal tape then textured and distressed. Most of the things came in a kit except for the pieces I harvested for other projects. Lots of gluing and trying to make things fit which can be a challenge though I'm happy with the results.


Next came an ATB (Artist Trading Block) challenge. I was having some fun with some new patina products I got from my local paper art store, Craft Fusion.The block was painted a rust color then a 2 part verdigris was applied here and there along with the plastic circles at the bottom. The angel started out as a frozen Charlotte doll which I then rusted. Then a rusted and distressed wing and a little rusted piece of lace held in place with some brown waxed linen cord and a decorative brad. I really enjoyed making this.


Dollar store tray painted and spruced up for Christmas

In anticipation of my Christmas party coming up this Saturday I made this tray as a craft project for the ladies who will be coming. Using examples of some dollar store tray ideas that I had seen on Pinterest, I combined a few paint techniques and added some leaf ribbon of my own. There was also a recipe for making your own chalkboard paint in any color that I used which was great because it's easy and a heck of a lot less toxic. Thanks to Curbly for that great paint recipe!

Now I need to go back to cleaning and decorating the house which seems to take forever. Well at least I'll be done early and can relax for the rest of the holidays.

Thanks for visiting!


Bride of Frankenstein


I made some Bride of Frankenstein wall hangings for some friends for Halloween. I used an image I purchased from the Silhouette store to use in my Silhouette cutter machine. Everything is mounted onto thin black foam core board and finished off with wire to hang and a lace tie.

Happy Halloween to all of you!


Halloween House


My fascination with making little houses started last year with this Halloween house which was made for a challenge in an art group I was attending. Sadly, our group broke up but I have a lovely memory of that fun time. We were to use an egg beaters or something similar like a milk carton and turn it into a Halloween house. Bet you wouldn't have known by looking at it. I had to cut out the indentation and rebuild the top of the house. Before I go on I want to give Mandy Jordan (junqegrrl on flickr) credit for being the inspiration for these houses. Go check out her really cool abandoned houses!

If I remember right I used Jerry's gesso which is very thick or else I may have used joint compound. Wish I took notes! Anyway, after that dried I painted the house in grays and tans wiping off the excess as I went along in order to highlight the texture. I then cut some cardboard for the roof and put more gesso/joint compound with a palette knife dragging it in one direction to get a roof texture. Then that was painted and wiped until I got the look I wanted.

The windows and front door must have been cut beforehand. I remember painting the interior of the house by using a small paint brush with dark gray paint and going through the windows and the door and just slopping it on the best I could. Then I got some florist's foam and carved out a little rocky landscape and plunked in some trees and some painted moss. The house was glued on and spider webbing was added in the trees. There was a big spider on the side of the house but I can't seemed to find it. Maybe it crawled away - eeewww!


Thanks for stopping by!


Upcycled houses part 1

I'm not sure whether to call this new venture upcycled or recycled houses but in a way it's both. I had some "green" kitty litter that I knew the cats probably would balk at and for that matter I'm afraid I'm too used to scoopable litter so I'm using it along with those annoying plastic grocery bags to fill my little houses which will be made from recycled cracker boxes.

A few years ago I came across Bella Dia's cereal box house tutorial and was so inspired that I thought I would try to make some of my own. There were a few modifications I made from the instructions such as don't score along the line on the front and back sides of the house or you'll get an indentation like this...

...which won't resolve itself with several coats of Jerry's gesso. See the indentation at the roof line?  The other thing is that these boxes are made from flimsy cardboard and will cave in here and there from all that gesso. Turning it inside out seemed like a good idea but maybe the moisture barrier keeps the cardboard wet too long which might be the other problem. I did use a lot of water to smooth out the gesso but I think I'll sand it instead. I didn't get any shots of how I did the window - which took a little engineering - but I will on the next one. Meanwhile in the back of my head I'm trying to think about how I want to paint/decorate the houses. I'm open to suggestions as I will (hopefully) be making these to sell at a craft fair in early November! To be continued...

Thanks for stopping by!

Having some fun with lettering

 I've been  having so much fun practicing my lettering while taking Joanne Sharpe's Letter Love online class. These are a few of the many assignments. The letters below were sketched out with a fine black pen then filled in with doodling and colored with various markers.


Here's a word made from this style of lettering.

Thanks for stopping by!